Thesis Writing with Scrivener
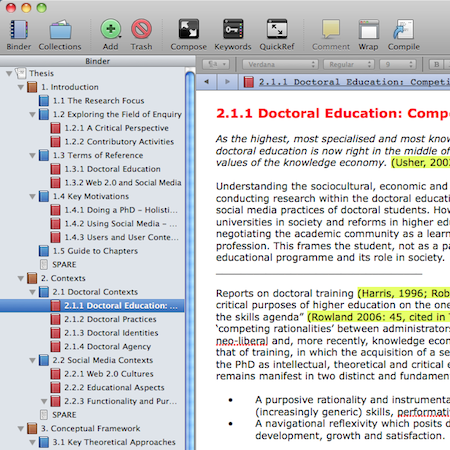
Wednesday, June 20th, 2012I mentioned Scrivener in a recent post. It would appear that this word-processing and file management desktop programme – specifically developed by Literature and Latte for writers – is becoming increasingly adopted by academics. There are other, more comprehensive accounts of using Scrivener on the web, such as here. But as a relatively new Scrivener user, here are some thoughts on my ongoing experience of using it in drafting my thesis.
Getting Started
Using Scrivener effectively requires a shift in thinking from traditional word processing programmes and practices. I tend to find the best way to learn new software is to dive straight in with a ‘real-life’ project. I found undertaking a 5,000-words conference paper ideal to familiarise myself with key Scrivener features and to start developing my own quirks. I’ve continued to use it for similar small-scale writing projects.
Scalability
Subsequently, in transferring my working thesis texts to Scrivener, I considered creating a separate project file for each individual chapter, and there are probably clever ways of linking / coordinating across projects that I have yet to explore. But I’ve found it more effective to develop the whole thesis within one project file, despite its obvious size. This enables easy transference or cross-referencing of texts across chapters and sections when required. Usefully, expandable / collapsible folders in the Binder (Scrivener’s side menu) allows quick viewing and access to all texts.
Chunkification
For me, the best way to go about using Scrivener is to think of texts in the form of ‘chunks.’ I think the most powerful feature of Scrivener is how it supports granularity in the writing process. It allows you to create, organise, aggregate and separate multiple texts of any size quickly and effectively within larger composite files and folders.
Files and Folders
The ability to change a file into a folder (and vice versa) is one of those features you don’t really ‘get’ at first. But after a while, I found it an instinctive process as texts are collated, merged and expanded as described above. For example, it may be useful to keep several text files in a folder during the editing process. Once you are happy with the arrangement of the collective texts, the folder can be changed into a single, more easily manageable file.
Formatting
I have to admit I’m a bit of a control freak when it comes to formatting. On the one hand, I love the minimalist look and feel of an unformatted writing environment – I often use Notepad or TextEdit for quick writing tasks. Then, on the other hand, when I require formatting, I want to be able to set up and apply my own style preferences easily and efficiently. Scrivener appears to satisfy both these needs fairly well.
Viewing Options
In the main document view, all the files within a folder can be viewed sequentially, as a composite text. I’ve therefore found it useful to insert the title (appropriately formatted in the style I want) at the top of each folder / file to distinguish them. I also use the split screen feature quite often now. It enables two texts files to be viewed alongside each other (vertically or horizontally). This is particularly useful for cross-referencing texts, or when transferring bits of text from one to the other. The in-built full-screen option (Compose) provides an uncluttered view of the document view. Though it’s not something I’ve really used much, I can see how some will be attracted to this Zen-like writing environment.
Note Taking
I’m still a bit ‘old skool’ when it comes to annotating texts – colour coding and highlighting texts directly to indicate different notations of work-in-progress – but Scrivener supports a number of note taking and tagging features that I may adopt in the future. I’ve also yet to use the ‘Corkboard’ view for indexing specific files and folders.
Supplementary Material
The Scrivener set-up encourages the inclusion of ‘supplementary’ material, such as other imported texts, PDFs and images etc. within project files (it has a default Binder folder called ‘Research’). I’ve found this a useful approach when writing papers, but I’ve decided to keep all support material separate for my thesis to keep it reasonably lightweight.
Summary
It is of course quite possible to write a thesis without Scrivener (as many do), and some of the ‘best practices’ I have discussed here can also be undertaken (to an extent) using more traditional word-processing platforms. Scrivener is not free but is relatively inexpensive, and, as a free trial version is available, I’d recommend at least taking a look. Though it was initially developed for a Mac (which I am using), a PC version is now also available.
There’s much more to Scrivener than the basics I’ve outlined here, and I may be blogging further thoughts once I become more familiar with it. I know of other users (particularly in #phdchat land) who could probably provide greater insight into its more advanced features and how they have adopted Scrivener in their own writing practices. The Scrivener website also provides a comprehensive set of tutorials.


